
Making a Railway Sleeper Coffee Table
Written by Eliza Lourenço
 |
| Railway sleepers in the yard at Coasties. |
The increasing popularity of recycled building materials has meant that railway sleepers have become a favoured choice for many DIY enthusiasts and professionals all over the world. With so many of them in the Coasties Big Shed yard, Matt decided to create his own railway sleeper coffee table. The following blog post is a rundown of his process.
First things first, the railway sleepers are cut in half, with one end being slabbed up for the tabletop boards, this means dressing the timber down to 30mm. If you need help with this step, Coasties offers timber dressing as a service so you can get your timber nice and clean and ready to resin.

After the tabletop wood is dressed, the other half is then milled for the legs and rails. Once this is done the fun part is pouring the black tinted resin into the natural grooves of the wood.

 Once dry, grab a belt sander and give the areas with the resin a light and even sanding.

 While you are waiting for the top to dry, the base needs to be clamped and glued as well. For this, you can use dowels like the top but Matt has used mortise and tenon joints in this process. After the 24 hours are up for the base and the top respectively, you can lightly use the belt sander to clean up any glue or resin that you've missed. Afterwards, the two parts can be joined together using pocket screws.


 |
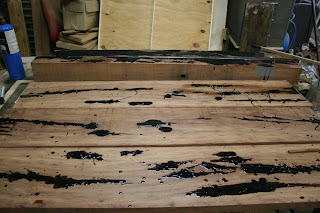
| Matt pouring the resin into the grooves. Note the duct tape on the sides. |
Matt uses an epoxy resin and says that there are many good brands available on the internet. Some carpenters will even choose a resin with an unusual colour in order to achieve a different effect, for example - a brilliant blue or even gold.
However, for beginners or those who want to achieve a classic look, sticking with black is best for this project. Before you begin to pour make sure that you've grabbed your duct tape and have taped the sides in order to create wells for the resin to fill up, making sure the resin cannot seep out. When you are happy, let the resin dry for 24 hours.

 Once dry, grab a belt sander and give the areas with the resin a light and even sanding.
The pieces for the tabletop are now ready to be clamped and glued together. Matt recommends using biscuit joints for this step but says that dowel joints are also another choice that can be considered. Like the resin, allow the glue to dry for a further 24 hours until the pieces are nice and firmly together.

 While you are waiting for the top to dry, the base needs to be clamped and glued as well. For this, you can use dowels like the top but Matt has used mortise and tenon joints in this process. After the 24 hours are up for the base and the top respectively, you can lightly use the belt sander to clean up any glue or resin that you've missed. Afterwards, the two parts can be joined together using pocket screws.
Now it's time for the final sanding using an orbital sander to get the entire surface ready for the finish. Like the resin, Matt says you can find various finishes on the internet very easily, the type he used is an oil based one with a mix of wax in it as well. The oil is especially good because it will sink into and cling onto the surface well.
After the finish has dried properly you will be left with one very beautiful railway sleeper coffee table ready to sell or to be placed in the lounge room.
The Final Product
Original piece used in this blog available at the Broken Bits store
located in Coasties Big Shed at 1 Collins St, Corrimal NSW.

Comments
Post a Comment